

UNITED STATES—Old 8mm films hold memories that many people want to preserve. These films often get damaged over time, and finding a way to watch or share them can be tough. Converting 8mm films to digital formats is a practical solution that makes it easier to keep those moments safe and accessible on modern devices.
There are several options to convert 8mm films, including using conversion machines, sending them to professional services, or doing it yourself with special kits. Each method has its own benefits and challenges. Convenient options usually involve equipment that is easy to set up and operate without needing technical skills.
When choosing a way to convert 8mm films, the key things to consider are the quality of the conversion, ease of use, and cost. Some devices offer better image clarity but can be expensive or hard to use. Others might be cheaper but produce lower-quality digital files. I looked into these factors to help find the most convenient ways to convert 8mm films.
Best 8mm Film Converters
- iMemories SafeShip Kit
- eyesen 8mm Film Converter
- Wolverine MovieMaker Pro
- Wolverine Titan Film Converter
- Kodak Reels Digitizer
- Kodak SCANZA Film & Slide Scanner
- Kodak Mini Film Scanner
- Jancane 8mm Film Converter
- DigitPro 8mm Film Converter
- Ambir Film & Slide Scanner
I have tested several 8mm film converters and found the most convenient options for turning old films into digital files. These products save time and make the process easy for anyone. Below is my list of the best converters you can buy today.
1. iMemories SafeShip Kit

This kit makes converting old films and tapes easy and safe, though it can be somewhat expensive.
Pros
- Sturdy crush-proof box keeps films protected during shipping
- AI technology visibly improves old footage quality
- Convenient app for streaming and sharing digitized movies
Cons
- Cost adds up if you have many reels to convert
- Transfer quality varies, sometimes not perfect
- No option for DIY conversion
I found the shipping box very solid. My old tapes arrived without damage, which was a relief. It’s clear they take care with the transport part.
The AI enhancements gave my films clearer colors and detail than I expected. Watching those old memories felt fresher and more vibrant after digital conversion.
Using their app was straightforward. I could watch the movies on my phone or TV without hassle. However, the price is a bit high, especially if you have lots of footage. Still, the ease and safety make it a good choice for keeping family memories.
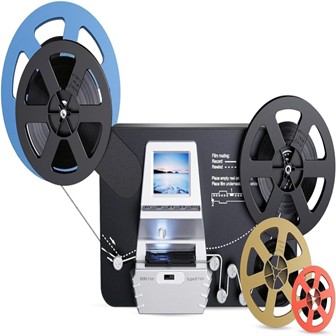
2. eyesen 8mm Film Converter

If you want an easy way to digitize 8mm films without using a computer, this device works but has some quirks.
Pros
- Fully automatic with simple operation
- Saves digital files directly to SD card
- Plays videos on built-in screen or TV
Cons
- Film advance can get stuck or misalign frames
- Small LCD is hard to see clearly
- Works best with proper reels and adapters
I tried this converter on several old home movies. It was nice not needing a PC or software—just pop in the reel and start scanning. The file quality looked decent with good color and resolution. I liked being able to watch clips right after scanning on the small screen.
However, the film feeding was frustrating sometimes. It would skip frames or get stuck, so I had to rewind and reset often. The small LCD screen made it hard to check details while converting, and the user manual wasn’t very clear on setup.
Still, the device did the job for turning film into digital files that I could easily save and share. It handles reels up to 9 inches, but smaller reels need special adapters. For a budget-friendly option without bells and whistles, this is a workable choice.
3. Wolverine MovieMaker Pro

This device offers a straightforward way to digitize 8mm and Super 8 films with good quality and minimal fuss.
Pros
- Easy to use without a computer
- Produces clear 1080p video files
- Works directly from SD cards
Cons
- Does not capture sound
- Limited to 32GB SD cards
- No support for 16mm film
When I first used the Wolverine MovieMaker Pro, I was impressed by how simple it was to set up. No computer or software was needed, which saved me time and hassle. Just insert the film, pop in an SD card, and start scanning.
The video quality lived up to what I expected from 1080p. My old family reels looked clean and the frame-by-frame process helped keep images sharp. However, if your film has sound, this machine won’t capture it.
One downside I noticed was the SD card size limit. For longer reels, I had to swap cards in the middle of a conversion. Still, the device handles Super 8 and 8mm films well and connects easily to TVs for quick playback. Overall, it’s a solid choice for digitizing old movies without extra gear.
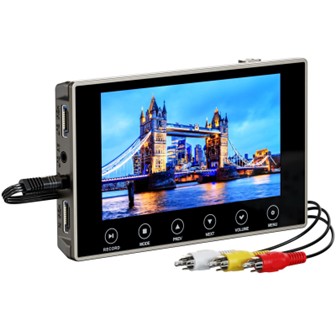
4. Wolverine Titan Film Converter
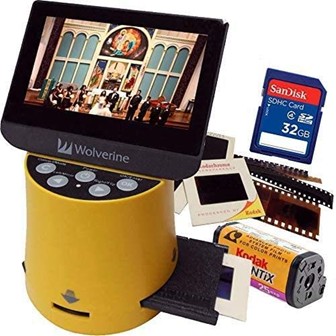
This converter is a simple and decent choice if you want to digitize various old films without needing a computer.
Pros
- Easy to use with one-button operation
- Supports many film types, including 8mm and APS
- Comes with a 32GB SD card and adapters
Cons
- Colors sometimes need manual fixing afterward
- Screen resolution is okay but not very sharp
- Power adapter requires a local plug adapter
When I used this Wolverine Titan, it was straightforward to get started. You just plug it in and press a button, no extra software needed. It handled not only 8mm film but also slides and negatives, which helped me clear a lot of old boxes.
The picture quality was good enough for most uses, though some colors looked off and needed a little editing on my computer afterward. The included SD card meant I didn’t worry about storage, and the adapters fit different film sizes without trouble.
I would say the built-in screen is okay for quick checks, but I preferred connecting it to my TV through HDMI to see the images clearly. Just remember to get a plug adapter if you’re outside North America since it’s not included. Overall, it’s a useful tool for home digitizing without complexity.
5. Kodak Reels Digitizer
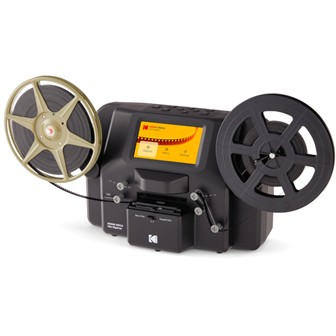
I found the Kodak Reels Digitizer to be a solid choice for turning old 8mm films into digital files without much hassle.
Pros
- Easy to use with on-screen guides
- Great picture quality with detailed, clear scans
- Portable size and all needed accessories included
Cons
- No sound captured during digitizing
- Takes time to transfer even short films
- SD card not included
The large five-inch screen really helped me see what I was doing. Navigating the menus and adjusting picture settings like sharpness or color was straightforward. I liked that it accepts many reel sizes, so I didn’t have to worry about compatibility.
While it took roughly 10 minutes to convert three minutes of film, the frame-by-frame scanning made the video look sharp and clear. However, it’s worth noting the device does not digitize sound, so any audio on the film is lost.
This digitizer is compact enough to carry around and includes all the reels and adapters I needed to get started right away. Just remember to get an SD card, since it doesn’t come with one. Overall, it’s a useful tool if you want to easily preserve your vintage movies.
6. Kodak SCANZA Film & Slide Scanner
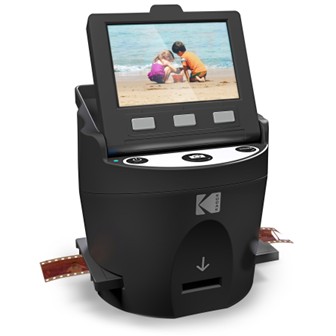
This scanner is a handy tool if you want a quick and easy way to turn your old films into digital pictures without fuss.
Pros
- Easy to use with large screen and clear menus
- Works with many film types including 8mm and Super 8
- Comes with adapters and cleaning brush for smooth operation
Cons
- Image quality is not as sharp as high-end scanners
- Only scans developed film, not raw or photos
- Shuts off automatically after 10 minutes of no use
I found the Kodak SCANZA to be simple to set up right out of the box. The large 3.5-inch screen helped me see what I was scanning instantly, which saved time compared to other scanners I’ve tried. The one-touch buttons made scanning easy, especially when dealing with different film sizes.
The built-in camera captures decent photos of the negatives, but the quality is just okay. If you want the perfect, crisp scans for professional use, this might not be the best choice. Still, for saving family memories quickly, it worked well enough.
I liked that Kodak included adapters for various film types along with a brush to keep dust off the screen. This helped avoid getting spots on my scans. Overall, it’s a solid option for anyone who values convenience and speed over top image quality.
7. Kodak Mini Film Scanner
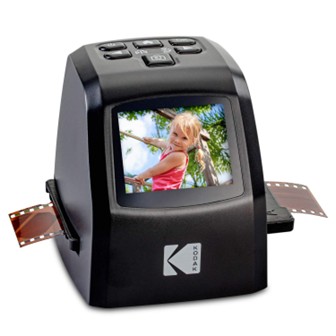
This scanner makes converting 8mm films and other formats easy without needing extra software.
Pros
- Comes with multiple adapters for different film types.
- Lets you edit images right on the device.
- Supports continuous scanning for fast work.
Cons
- Internal memory is small, needs an SD card.
- Image quality can vary depending on film type.
- Feels lightweight and not very sturdy.
I found the Kodak Mini Film Scanner very user-friendly. Setting up the right adapter was simple, and it worked well with my old 8mm films and slides. The 2.4-inch screen helped me check scans immediately and make quick adjustments like brightness and flipping the image.
Scanning was fast, especially when I loaded several negatives in a row. The ability to save photos as JPEGs straight to an SD card is handy if you want to move files around without a computer.
However, the device does feel a bit light and fragile compared to other scanners I’ve tried. Also, while it boosts resolution up to 22MP, the picture quality does not always look sharp, especially with older or damaged film. Despite those minor downsides, it offers good value for simple home use.
8. Jancane 8mm Film Converter
This converter works well for clear, undamaged 8mm films but can struggle with older or worn reels.
Pros
- Easy to use with a clear 2.4” LCD screen
- Converts films directly to MP4 without a computer
- Includes everything needed, like SD card and cables
Cons
- Film can jam if reels have damage or splices
- No sound digitization, video only
- Limited SD card space for large reels
I found the Jancane 8mm Film Converter straightforward when my films were in good shape. The touch buttons and screen made it simple to adjust settings and preview footage. Loading reels was mostly easy using the supply reel attachment.
However, some older films with splices or bent frames caused jams. I had to stop and fix these jams several times, which slowed the process. The device only captures video, so if you want audio, you will need a separate solution.
Storage on the included 32GB SD card filled up fast for longer reels. I had to transfer files to my computer often. Still, I appreciated no need for computer software during conversion. This unit suits anyone with mostly intact 8mm films wanting a budget-friendly digitizing option.
9. DigitPro 8mm Film Converter
This converter is a solid choice if you want an easy way to digitize your 8mm films without needing a computer.
Pros
- Records in 4K resolution for clear videos
- Works standalone—no computer or software needed
- Built-in screen and speakers for easy preview
Cons
- Video files split into segments after 20 minutes
- USB flash drive not included
- Battery life lasts around 3 hours, which might feel short
I used this DigitPro converter to transfer old 8mm family videos, and the 4K capture really brought out the details I remembered. The preview screen helped me check clips right after recording, which saved time.
It’s convenient that the device doesn’t need a computer or extra software. Just plug in your tape player and an SD card, and it records directly to MP4. The live commentary feature through the mic jack is a nice bonus if you want to add narration.
One downside was the recording time splits into chunks, so I had to join videos later on a computer. Also, it doesn’t come with a USB drive, so plan to use your own. Still, for portability and ease of use, this worked well for me.
10. Ambir Film & Slide Scanner

This scanner is a decent option if you want an easy way to digitize various film types but expect some quirks in performance.
Pros
- Handles different film sizes including 8mm easily
- Large 5-inch color screen lets you preview scans right away
- Comes with software to improve and organize your photos
Cons
- The scanning process can be slow at times
- Software is helpful but sometimes glitches or lags
- Image resolution is good but not the best for very fine details
When I used this scanner, I liked how it supported everything from 8mm films to old slides without fuss. Switching between formats was straightforward, which saved me time. The LCD made checking results fast so I knew right away if I needed a rescan.
The included editing tools actually helped restore some color to faded images, which was nice since some of my films had seen better days. Still, the software wasn’t perfect and would hang occasionally, making me restart. Also, the scans took longer than I expected.
Overall, this scanner fits if you want an all-in-one device that makes converting old films easier, but you may need patience for some rough spots. It’s not the fastest or highest-quality option but gets the job done for casual use.
Buying Guide
When I shop for an 8mm film converter, I look for a few key features. The first is video quality. I want a converter that captures clear images and good color.
Another important feature is ease of use. I prefer devices that are simple to set up and operate. Some have touchscreens or automatic settings, which help me avoid extra steps.
I also check for speed and batch processing. If I have many films to convert, a faster machine or one that handles multiple reels saves me time.
Compatibility is something I cannot ignore. It is important the converter works with my computer or storage device. Some use USB, while others save to SD cards.
| Feature | What to Look For | Why It Matters |
| Video Quality | HD or near HD output | Clear, sharp images |
| Ease of Use | Simple controls, automatic options | Less hassle during conversion |
| Speed | Fast processing, batch options | Saves time when converting |
| Compatibility | USB, SD card, or other connections | Fits with my existing devices |
Price can be a factor but I focus more on features that fit my needs. Sometimes, spending a bit more gives better quality and convenience.
Finally, I read reviews or watch demonstrations when possible. It helps me understand how well the converter works before buying.
Frequently Asked Questions
I’ve gathered clear answers about converting 8mm film to digital. You will learn about methods, equipment, services, and options to make the process easier.
What are the best methods for converting 8mm film to digital format?
Using a dedicated 8mm film scanner gives the best quality. Another option is to use a film projector linked to a digital camera or computer. Direct scanning is faster but usually costs more.
How can I transfer 8mm film to digital without using a projector?
You can buy a film scanner designed for 8mm films. These devices scan each frame and save it digitally. It avoids the need for bulky projectors and simplifies storage.
What services are available for digitizing 8mm film at local stores?
Many photo shops and camera stores offer film transfer services. They typically digitize the film and provide files on USB drives or DVDs. Prices vary based on length and quality needed.
Can 8mm films be transferred to DVD, and what is the process?
Yes, many services or DIY setups convert 8mm films to DVD. The film is first digitized and then burned onto a DVD with video software. It’s a way to make the film easy to watch on DVD players.
What equipment is required to convert 8mm film to digital by myself?
You need an 8mm film scanner or a projector with a camera. Extra tools include a computer with editing software. Good lighting and cleaning supplies help improve the digital output.
Are there free options for converting 8mm film to digital formats?
There are no fully free tools for high-quality conversion. However, local libraries or community centers sometimes offer free or low-cost use of film scanners. You can also try smartphone apps but expect lower quality.


")
